Network Configuration
Name the network connection as “public” and “private”
Amend the C:\windows\system32\drivers\etc\hosts file to contain the following information.
127.0.0.1 localhost.localdomain localhost
# Public
192.168.96.3 rac1.localdomain rac1
192.168.96.4 rac2.localdomain rac2
#Private
192.168.40.2 rac1-priv.localdomain rac1-priv
192.168.40.3 rac2-priv.localdomain rac2-priv
#Virtual
192.168.96.111 rac1-vip.localdomain rac1-vip
192.168.96.112 rac2-vip.localdomain rac2-vip
# SCAN
192.168.96.201 rac-scan.localdomain rac-scan
Addition changes:First, ensure the public interface is first in the bind order:
- Open the "Network Connections" dialog by right-clicking on the "Network" .
- Press ALT and select the "Advanced > Advanced Settings..." menu option.
- On the "Adapters and Bindings" tab, make sure the public interface is the first interface listed.
- Accept any modifications by clicking on the "OK" button and exiting the "Network Connections" dialog.
Second, disable Windows Media Sensing for TCP/IP:
- Backup the Windows registry.
- Run the Registry Editor (Regedt32.exe) and find the following key:
HKEY_LOCAL_MACHINE\System\CurrentControlSet\Services\Tcpip\Parameters
- Add the following registry value:
Value Name: DisableDHCPMediaSense
Data Type: REG_DWORD -Boolean
Value: 1
Third (Optional, not required), disable IPV6:
- Download “Disable native IPv6 interfaces” - http://go.microsoft.com/?linkid=9732131
- Download “Disable tunnel IPv6 interfaces” - http://go.microsoft.com/?linkid=9732984
- Run the downloads on both nodes.
- Run the Registry Editor (Regedt32.exe) and find the following key:
HKEY_LOCAL_MACHINE\System\CurrentControlSet\Services\Tcpip6\Parameters
Add the following registry value:
Value Name: DisabledComponents
Data Type: REG_DWORD -Boolean
Value: 1
- Restart Both Nodes
- This change will not take effect until the computer is restarted.
- Open the "Network Connections" dialog by right-clicking on the "Network" – “Properties” – Change adapter settings .
- Uncheck “Internet Protocol Version 6(TCP/IPv6)” for each adapter:
- Press ALT and select the "Advanced > Advanced Settings..." menu option.
- Uncheck “(TVPIP/IPv6)” boxes:
Create Shared Disks
- Add 5 disks, SCSI, Independent, Allocate all disk space now, Virtual device node from SCSI 1:1 to SCSI 1:5.
(If Shared disk configure fails, RAC will be not installed on the second node, and you’ll see error message under $CRS_HOME/log/diag/asm/+asm/+asm2/trace/alert_+asm2.log.
To bypass it, you can edit the setting of the second VM node, add disk, using existing disk created by node 1.)
- Edit the contents of the “RAC1\RAC1.vmx" file using a text editor, making sure the following entries are present. Some of the tries will already be present, some will not.
disk.locking = "FALSE"
diskLib.dataCacheMaxSize = "0"
diskLib.dataCacheMaxReadAheadSize = "0"
diskLib.dataCacheMinReadAheadSize = "0"
diskLib.dataCachePageSize = "4096"
diskLib.maxUnsyncedWrites = "0"
scsi1.present = "TRUE"
scsi1.virtualDev = "lsisas1068"
scsi1.sharedBus = "VIRTUAL"
scsi1:1.present = "TRUE"
scsi1:2.present = "TRUE"
scsi1:3.present = "TRUE"
scsi1:4.present = "TRUE"
scsi1:5.present = "TRUE"
scsi1:1.writeThrough = "FALSE"
scsi1:2.writeThrough = "FALSE"
scsi1:3.writeThrough = "FALSE"
scsi1:4.writeThrough = "FALSE"
scsi1:5.writeThrough = "FALSE"
scsi1:1.fileName = "D:\vm\Windows 2008 Rac ShareStorage\asm1.vmdk"
scsi1:1.mode = "independent-persistent"
scsi1:2.fileName = "D:\vm\Windows 2008 Rac ShareStorage\asm2.vmdk"
scsi1:2.mode = "independent-persistent"
scsi1:3.fileName = "D:\vm\Windows 2008 Rac ShareStorage\asm3.vmdk"
scsi1:3.mode = "independent-persistent"
scsi1:4.fileName = "D:\vm\Windows 2008 Rac ShareStorage\asm4.vmdk"
scsi1:4.mode = "independent-persistent"
scsi1:5.fileName = "D:\vm\Windows 2008 Rac ShareStorage\asm5.vmdk"
scsi1:5.mode = "independent-persistent"
floppy0.present = "FALSE"
scsi1:1.redo = ""
scsi1:2.redo = ""
scsi1:3.redo = ""
scsi1:4.redo = ""
scsi1:5.redo = ""
scsi1:1.deviceType = "plainDisk"
scsi1:2.deviceType = "plainDisk"
scsi1:3.deviceType = "plainDisk"
scsi1:4.deviceType = "plainDisk"
scsi1:5.deviceType = "plainDisk"
- Start the RAC1 virtual machine by clicking the "Power on this virtual machine" button on the VMware Server Console. When the server has started, log in so you can partition the disks.
- Prior to partitioning the disks, you must enable disk automounting. To enable automounting do the following command at the command prompt, then restart the server.
C:\> diskpart
DISKPART> automount enable
DISKPART> exit
C:\>
- Partition the disks using the "DiskPart" utility. To get alist of the current disks do the following.
C:\>diskpart
Microsoft DiskPart version 6.0.6001
Copyright (C) 1999-2007 Microsoft Corporation.
On computer: RAC1
DISKPART> list disk
Disk ### Status Size Free Dyn Gpt
-------- ---------- ------- ------- --- ---
Disk 0 Online 24 GB 0 B
Disk 1 Online 10 GB 10 GB
Disk 2 Online 10 GB 10 GB
Disk 3 Online 10 GB 10 GB
Disk 4 Online 10 GB 10 GB
Disk 5 Online 10 GB 10 GB
DISKPART>
- In the diskpart utility we will perform the following commands.
automount enable
select disk 1
create partition extended
create partition logical
select disk 2
create partition extended
create partition logical
select disk 3
create partition extended
create partition logical
select disk 4
create partition extended
create partition logical
select disk 5
create partition extended
create partition logical
exit
(If you want to create partition for a raw disk, create partition extended first, then create simple volume in disk management.)
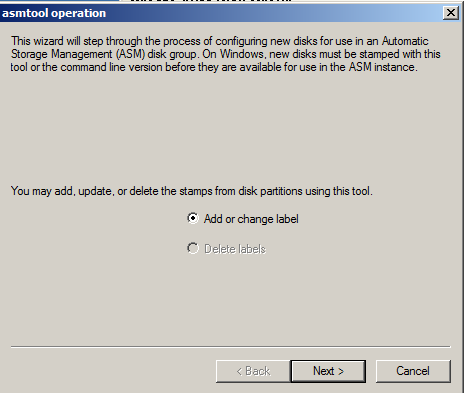
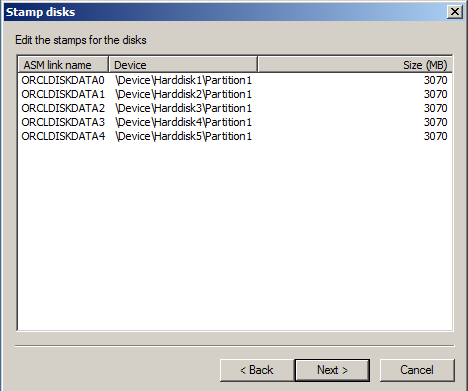
- Create ASM disk group for both nodes with the tool asmtoolg under “asmtool” folder of the installation CD
- Click “Next” in “asmtool operation” window:
- Select 5 disks created and click Next:
- Edit the attributes then click “Next”:
- Click “Finish”:


- Turn off windows firewall
- Shut down the RAC1 virtual machine and copy the RAC1 virtual machine.
- Edit rac1.vmx change displayName = "RAC2".
- Start rac2, modify machine name,ip address and restart rac2, rac1.
- Once the RAC2 virtual machine has restarted, start the RAC1 virtual machine. When both nodes have started, check they can both ping all the public and private IP addresses using the following commands.
ping rac1
ping rac1-priv
ping rac2
ping rac2-priv
on Rac1:
net use \\rac2\c$
On Rac2:
Net use \\rac1\c$
Prior to 11gR2 we would probably use the "runcluvfy.sh" utility in the clusterware root directory to check the prerequisites have been met. If you are intending to configure SSH connectivity using the installer this check should be omitted as it will always fail. If you want to setup SSH connectivity manually, then once it is done you can run the "runcluvfy.sh" with the following command.
runcluvfy.bat stage -pre crsinst -n rac1,rac2 -verbose
Install the Grid Infrastructure
Start the RAC1 and RAC2 virtual machines, login to RAC1 as the oracle user and start the Oracle installer.
./runInstaller
Select the "Install and Configure Grid Infrastructure for a Cluster" option, then click the "Next" button.
Select the "Typical Installation" option, then click the "Next" button.
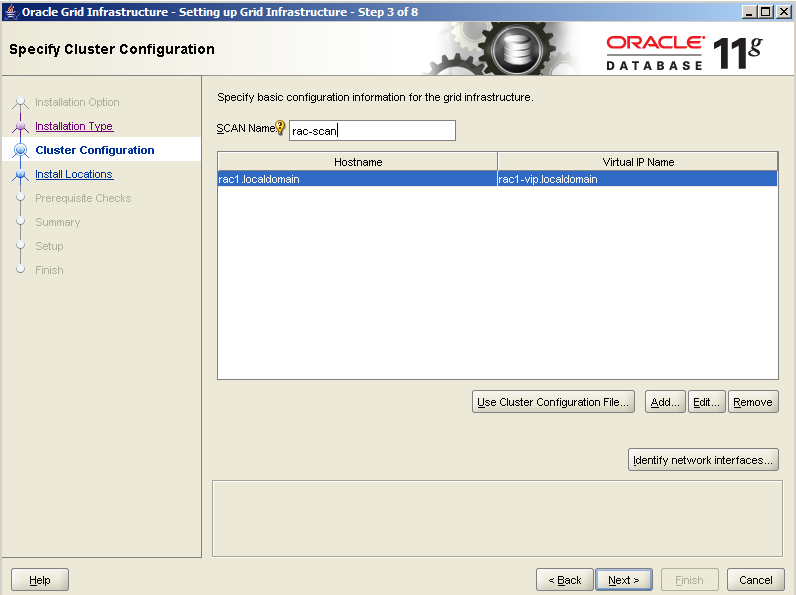
On the "Specify Cluster Configuration" screen, click the "Add" button.
 Enter the details of the second node in the cluster, then click the "OK" button.
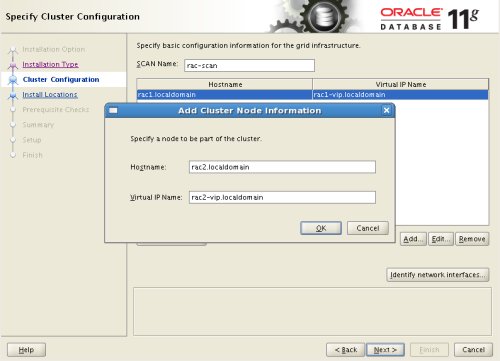
Click the "Identify network interfaces..." button and check the public and private networks are specified correctly. Once you are happy with them, click the "OK" button and the "Next" button on the previous screen.

Change the software location if you like, choose "Automatic Storage Manager" as the cluster registry storage type. Enter the ASM password and click the "Next" button.

You’ll see 5 disks in the candidate. Set the redundancy to "External", select all 5 disks and click the "Next" button.

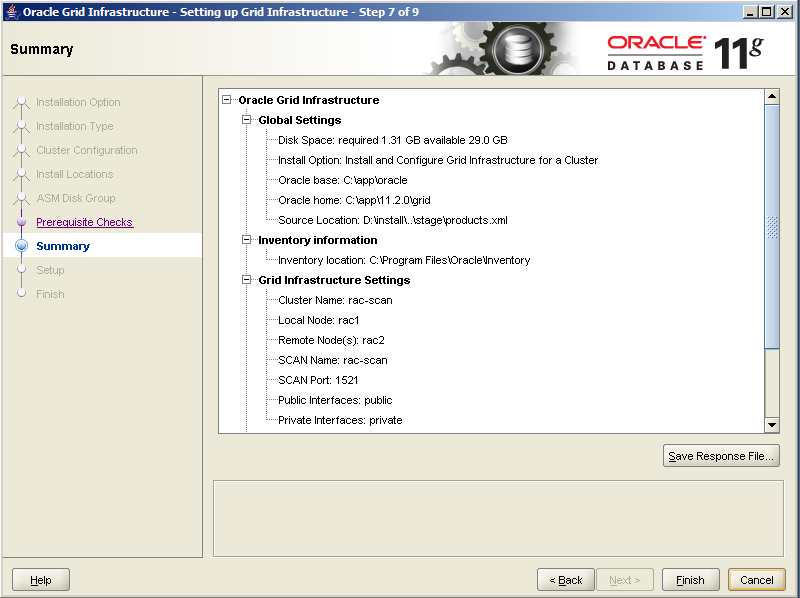
If you are happy with the summary information, click the "Finish" button.
Wait while the setup takes place.

Wait for the configuration assistants to complete.

If you choose advanced installation:


Install the database
Uncheck the security updates checkbox and click the "Next" button.
Accept the "Create and configure a database" option by clicking the "Next" button.
Accept the "Server Class" option by clicking the "Next" button
Make sure both nodes are selected, and then click the "Next" button.
Accept the "Typical install" option by clicking the "Next" button.

Accept the install locations. The storage type should be set to "Automatic Storage Manager". Enter the appropriate passwords and database name, in this case "rac".
We’re using Standard edition here. You can choose enterprise edition.

Wait for the prerequisite check to complete. If there are any problems either fix them, or check the "Ignore All" checkbox and click the "Next" button.
If you are happy with the summary information, click the "Finish" button.
Wait while the installation takes place.
Once the software installation is complete the Database Configuration Assistant (DBCA) will start automatically.
Once the Database Configuration Assistant (DBCA) has finished, click the "OK" button.
When prompted, run the configuration scripts on each node. When the scripts have been run on each node, click the "OK" button.
The RAC database creation is now complete.
Check the Status of the RAC
There are several ways to check the status of the RAC. The srvctl utility shows the current configuration and status of the RAC database.
If you have configured Enterprise Manager, it can be used to view the configuration and current status of the database using a URL like "https://rac1.localdomain:1158/em".

You can use the following tns settings for the client:
rac =
(DESCRIPTION =
(ADDRESS = (PROTOCOL = TCP)(HOST = 192.168.96.3)(PORT = 1521))
(ADDRESS = (PROTOCOL = TCP)(HOST = 192.168.96.4)(PORT = 1521))
(LOAD_BALANCE = yes)
(CONNECT_DATA =
(SERVER = DEDICATED)
(SERVICE_NAME = rac)
)
)
Hi,
ReplyDeleteCan you please add blog on how to add node on Oracle 11gR2 RAC on Windows 2008 R2 using VMWARE.
Hi Mohd,
ReplyDeleteTo add a node is pretty much straight foward:
1. Check nodeapp setup is complete with cluvfy
cluvfy stage -pre nodeadd -n rac5
2. Run addNode.bat in $CRS_HOME/oui/bin from an existing node:
addNode.bat "CLUSTER_NEW_NODES={rac5}" "CLUSTER_NEW_VIRTUAL_HOSTNAMES={rac5-vip}" -silent
3. Use
cluvfy stage -post nodeadd -n rac5
to verify node addition and that cluster is not divided into two seperate parts.This may give the following error.
Reasons are explained in metalink note PRVF-4664 PRVF-4657: Found inconsistent name resolution entries for SCAN name [ID 887471.1]In this case it was because the scan ip was listed on host file. This concludes the first phase of adding a node. Next is to add the oracle home to the new node.
4. To extend the ORACLE_HOME (RAC) run addNode.bat from $ORACLE_HOME/oui/bin:
addNode.bat -silent "CLUSTER_NEW_NODES={rac5}"
5. Use DBCA to add a instance to the new node via instance management.
6. Check addition of the new node with cluvfy:
cluvfy comp admprv -o db_config -d $ORACLE_HOME -n rac4,rac5
hi,
ReplyDeleteI am stucking with installing 11.2.0.3 GI on winodows 2008 r2 nodes VM. Install is failing at "configuring grid infrastructure". From logs i can see GI configuratiin is completing successfully in first node. However on remote node, oracleobject service is failing to start. Also i can see when this issue happens, diskpart on remote node hangs. Any inputs?
2012-07-03 15:57:43: Create Oracle Object Service successfully
ReplyDelete2012-07-03 15:57:43: Creating Oracle Fence Service...
2012-07-03 15:57:43: Executing D:\appcrs\11.2.0\grid\bin\crssetup.exe installFence
2012-07-03 15:57:43: Executing cmd: D:\appcrs\11.2.0\grid\bin\crssetup.exe installFence
2012-07-03 15:57:44: Command output:
> <15:57:44> Started
> <15:57:44> arguements 2
> <15:57:44> D:\appcrs\11.2.0\grid\bin\crssetup.exe
> <15:57:44> installFence
> <15:57:44> returning 0x0
>End Command output
2012-07-03 15:57:44: Create Oracle Fence Service successfully
2012-07-03 15:57:44: Starting OracleClusterVolumeService...
2012-07-03 15:57:44: Waiting for OracleClusterVolumeService to start
2012-07-03 15:58:44: Waiting for OracleClusterVolumeService to start
2012-07-03 15:59:43: Starting Oracle Object Service...
2012-07-03 15:59:43: Waiting for Oracle Object Service to start
2012-07-03 16:00:41: Waiting for Oracle Object Service to start
2012-07-03 16:01:39: Waiting for Oracle Object Service to start
2012-07-03 16:02:37: Waiting for Oracle Object Service to start
2012-07-03 16:03:35: Waiting for Oracle Object Service to start
2012-07-03 16:04:33: Error Oracle Object Service failed to start
2012-07-03 16:04:33: Platform-specific setup failed
Hi Mohamed,
ReplyDeleteHave you disabled firewall and Windows Media Sensing for TCP/IP?
Is disk.locking set to "FALSE"?
What's the diskgroup status for second node?
Also do you have any antivirus software installed?
ReplyDeleteLast, when you create the share disks, did you choose "Allocate all disk space now"
Hi Mohamed,
ReplyDeleteI have an error "ins-40725 unable to determine the existence of an interface with a subnet matching the scan subnet"
but I set the IP same you.
please help me !!
hi Kevin ,
Deletei have same problem have u got solution to it???
Thank you!!!! The VMX configuration info is solid gold!
ReplyDeleteHi it is good doc , but do you implement RAC 11gr 2 using OCFS
ReplyDeleteHi shafique,
ReplyDeleteNo, for this install i didn't use OCFS, but it's pretty much same concept. You just need to make sure the shared disks are accessible by both nodes.
Hi This is a really good doc! But how should I use this RAC in my application server. This app is in vm too and stays on the same host with the rac1, rac2 vm. Should I add some ip and host info in the C:\Windows\System32\drivers\etc\hosts file?
ReplyDeleteHi Desmond,
DeleteIf you are asking how to connect to an oracle database, you'll need to edit the tnsnames.ora to add the entry.
Our example here is:
rac =
(DESCRIPTION =
(ADDRESS = (PROTOCOL = TCP)(HOST = 192.168.96.3)(PORT = 1521))
(ADDRESS = (PROTOCOL = TCP)(HOST = 192.168.96.4)(PORT = 1521))
(LOAD_BALANCE = yes)
(CONNECT_DATA =
(SERVER = DEDICATED)
(SERVICE_NAME = rac)
)
)
Hi! Thanks for your reply! I think this is the method to connect to rac database throuhg oracle client. I was trying to connect to the rac database from my app. I think I should configure the app server's network. Make it able to access the 192.168.96.* ip.
DeleteDFW Fence and Shade has been helping homeowners all over the North Dallas Area affordably beautify their homes with custom fences, decks, arbors, patios, and patio covers for the past 5 years.
ReplyDeletecolored chain link fence